87 Olds Rally Gauge Refurbish

oldsofb

Member
Oct 4, 2018
22
28
13
Maryland
Disassembly on the bench:
Rally Gauge 1.JPG


You will need a 1/4 inch nut driver and a 7 mm nut driver (for the gear indicator if you have a column shift and plan to convert to center console)

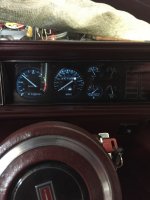
Remove the (4) 1/4 inch screws that hold the clear lens on. (Note the poor condition of the lens plastic)
Rally Gauge 2.JPG


The same 4 screws held the gauge cover underneath in place. Remove this as well.
Rally Gauge 3.JPG


With both covers removed, you can start to remove the (5) 1/4 inch gauge screws.
Rally Gauge 4.JPG


With the screws removed, you can pull the speedo out. The other gauges are held on the backside by studs on the gauges and pinch connectors on the housing. They have a little resistance, but can be pulled straight out.
Rally Gauge 5.JPG

Rally Gauge 6.JPG

Rally Gauge 7.JPG

Rally Gauge 8.JPG


to be continued...
 
  • Like
Reactions: TURNA

oldsofb

Member
Thread starter
Oct 4, 2018
22
28
13
Maryland
The "Warning Light" overlay and light separation box underneath along with the Turn Signal/High Beam Indicator can be removed, as they were held down by the gauge cover. Be careful not to damage the gasket under the light separation box when removing.
Rally Gauge 9.JPG

Rally Gauge 10.JPG

Rally Gauge 11.JPG


if you are removing the gear indicator, there are (2) 7mm screws on the bottom of the cluster. (I kept mine in)

Be sure to note or photograph the bulb placement on the back of the cluster where the printed circuit is located. I cleaned all the contacts and the 5/16 nut bottoms with a small piece of red scotch brite. A light touch is recommended (it's 31 years old)
Rally Gauge 13.JPG


Here it is completely torn down.
Rally Gauge 12.JPG


If you are not doing any modifications to the stock configuration, you can clean or repair any parts and begin to reassemble in the reverse order.

to be continued...
 
Last edited:
  • Like
Reactions: TURNA

oldsofb

Member
Thread starter
Oct 4, 2018
22
28
13
Maryland
With the cluster reassembled, let's address the lens cover before installing it.

I bought a 3M Headlight Restoration kit. I also used Meguiars PlastX, a micro fiber applicator and towel along with some water and a cordless drill.
IMG_4069.JPG


Here is the kit unboxed.
IMG_4070.JPG


I try the process out on a used old lens cover. There are 3 sanding pads (medium, fine, and trizact). I started with the fine pad because the scratches weren't too deep. You can attach to a drill or hand sand. I made several passes until the entire surface was opaque and free of any deep scratches.
IMG_4072.JPG


Next it's on to the Trizact pad. You'll need the drill for this stage.
IMG_4074.JPG


Wet the pad and the lens surface. Begin sanding in even passes until a white "slurry" appears. Once that happens, make 5 to 10 slow passes over the entire surface. Clean and check for any scratches you may have left. I use the fingernail check. If you can pick up a scratch deep enough that your fingernail catches it, go back to the sanding pad and sand evenly until it's gone. Then back to the Trizact.
IMG_4075.JPG


You will end up with a smooth, but hazy surface.
IMG_4076.JPG


Now for the magic. Switch to the buffing pad. Mist the surface of the pad with water and apply a dollop of the PlastX. Buff for multiple passes, then clean and check. Repeat the process until you have a clear even surface. Mist the pad with a little water each time and add some PlastX again. It may take several applications to get it just right.
IMG_4078.JPG

IMG_4079.JPG

IMG_4080.JPG


Once you're happy with the results, switch to a micro fiber wax applicator and hand buff with the PlastX or the wax included in the 3M kit. Mist a little water on the applicator as well.
IMG_4081.JPG

Results to follow...
 
  • Like
Reactions: TURNA

oldsofb

Member
Thread starter
Oct 4, 2018
22
28
13
Maryland
With all the sanding, more sanding, buffing, waxing, and more waxing done, the difference is noticeable. It's hard to get a decent shot of just how great the change is. In the picks you can see two fingernail deep scratches that went horizontally across the face of the lens from the "Trip OD" hole to the far left edge. The scratches are completely removed where the tape didn't cover them.
IMG_4082.JPG

IMG_4084.JPG


Here is a shot of the lens sitting loose on the bench with the cluster sitting below. (I switched to a "Granny" lens that's without a "Trip OD" hole for a Trip Delete) This is prior to any work being done.
Rally Gauge 1.JPG


The same lens after sanding and buffing and waxing.
Rally Gauge 21.JPG


That's it in a multi post nutshell.

Hutch
 
  • Like
Reactions: TURNA

JimH.

New member
Oct 27, 2018
7
16
3
Dayton, Ohio
One of the best things I did was to replace all the old bulbs with LED ones, it’s amazing how much brighter the gauge cluster is. I’m assuming you own a 442 that is the only year you can get the factory original 120 mph speedometer.
 

oldsofb

Member
Thread starter
Oct 4, 2018
22
28
13
Maryland
One of the best things I did was to replace all the old bulbs with LED ones, it’s amazing how much brighter the gauge cluster is. I’m assuming you own a 442 that is the only year you can get the factory original 120 mph speedometer.

That's correct. A 1987 442 (the only 120 speedo year). The LED upgrade is going in mine as well.

Hutch
 

JimH.

New member
Oct 27, 2018
7
16
3
Dayton, Ohio
That's correct. A 1987 442 (the only 120 speedo year). The LED upgrade is going in mine as well.

Hutch
Super bright LEDs have a great selection, I used green ones for turn signals then blue for brights also I think I used a variety of lengths to get the best light. While you have it out take measurements of how long a bulb you can use. My car is in storage but next time I’ll take a picture with the LED’s. Oh and I removed the check engine light bulb
 

82cutty

Member
Dec 13, 2019
52
27
18
central PA
Old thread, but man this brings back a lot of memories, @oldsofb . My story is, I updated to rally dash in 2003 . Picked it up at a scrapyard and used the pinout diagram from this site. A month after install the odometer quit. I had a free standing Sun laying around so I gutted it, and integrated it into the ralley dash and did the cleanup at that time as well. I used a liquid wax but that's all mine needed.

Lens is still very clear, that's just weird reflections from sunlight behind me (and my fingers) . I took the pic while driving without taking my eyes off the road.
Took the picture to send my son later after fixing gas gauge last November. The tank and sending unit needed replaced after the car sat for ten years.

Just had to post after seeing yours. Plus I'm also looking at LED upgrade further down the road.


f
20191110_085102.jpg
 
  • Like
Reactions: TURNA

Latest posts